dogdop- yes I noticed that bolt onto HB cables today, I'd already bled the otherside and put the wheel back on but my thoughts were that the bolt must be in the wrong way around
Matt- I'm mostly there with the throttle pedal now, much tighter pivot shaft, I'll fabricate a stop to set the initial position of pedal and another stop for full throttle, its a pet hate have the full weight of a right foot on carb/TB linkages. A couple of return springs on order.
Rod end for the linkage ordered, and a bit of welding today to sort the bits out, some grinding of sharp edges and de-rusting stuff. Will be a ready for paint then.
I can't imagine the fitment of the R1 motor was a factory effort, it's pretty amateur. Engineering wise it's not bad, it's more the finishing and the thought process. For instance i can't reach the engine start when strapped in!
Bonnet bulge, er no idea, got any thoughts?
Can you point me in the direction of the pics of yours as to how the harnesses fit through the body at the back please, I can't for the life of me think how my Phoenix was done, though it was on 3 point belts anyway. These are 6 pt, the bottom straps going over the seat and back to the two waist strap fixings! where do others fit them?
Rob- interested in your bonnet hinge design! I also thought that with my other Phoenix that it was a lousy design, I fitted a stop strop to stop it hitting the ground.
I see from the Locost forum that Adithorp has an R1 engined car, seems there are some baffling mods to do too. Best get in touch with him!
It's not yellow and it's no 21 [image heavy]
-
philfingers
- Posts: 123
- Joined: Sat Mar 12, 2011 9:34 pm
- Name: Phil of course
- Location: Kidderminster, Worcestershire, UK
Re: It's not yellow and it's no 21 [image heavy]
STM Phoenix R1 IRS Quaiffe reverse & LSD
Sold- Sylva Striker 1660 XF, 40s live axle
Sold- Sylva Phoenix- 1300 XF, 234, 40s live axle.
205 mi16 tarmac rally car, Audi A6 2.7 TDi S-line and a few motorbikes
Sold- Sylva Striker 1660 XF, 40s live axle
Sold- Sylva Phoenix- 1300 XF, 234, 40s live axle.
205 mi16 tarmac rally car, Audi A6 2.7 TDi S-line and a few motorbikes
-
RobMsport

- Posts: 704
- Joined: Thu Jul 02, 2009 2:36 pm
- Name: Rob Farley
- Location: Aston Clinton , BUCKS
Re: It's not yellow and it's no 21 [image heavy]
Phil , email me and I'll find some pics of what I did to keep it upright and clearing the ground. My front lower chassis rail is 70mm off the ground and my timing strut still ' just ' clears the gropund by 8/10mm . The hinge needs to be well forward and the pivot low down.
-
adithorp

- Posts: 1200
- Joined: Thu Jul 02, 2009 8:26 am
- Name: adrian thorp
- Location: Hyde, Manchester
Re: It's not yellow and it's no 21 [image heavy]
The oil and breather mods aren't too baffling.
1. You need a sump baffle. Andy Bates sells them, amongst others.
2. Breather mod'. Without it when cornering hard left the oil will rise high enough to reach the gearbox breather and the crankcase pressure will force the oil up the breather. If the breather is still plumbed to the air box... best case, blue smoke and worst, hydraulic lock! I had the blue smoke and then with it fed direct to a catch tank it filled 1/2lt in 20 mins on track. With the following mod, I get no oil in the tank, just a bit of oily water if doing short runs in damp weather.
Easy enough to fix with second breathers from the cam cover. Remove the cam cover and AIS box lids. Remove the reed valves (save or discard) from the AIS and plug the holes from there to the exhaust tract (dowels or grub screws). Drill a couple of holes through from each AIS housing to the cam side (lower edge allows any oil to drain back). Refit the cover. Put some folded mesh or stainless pan scrub, etc) inside the AIS box to condense oil vapor and refit the covers. Feed pipes from the AIS outlets, T them together and then into the gearbox breather. Feed that either to the air-box or a catch tank (mine goes to a catch tank and then that breathes to the air-box). The AIS valve (if you still have it) can simply be unplugged and removed; It doesn't cause a fault code.
-
matt_gsxr

- Posts: 291
- Joined: Tue Jul 14, 2009 2:18 pm
- Name: Matthew Robson
- Location: Oxford
Re: It's not yellow and it's no 21 [image heavy]
Bit of information on bonnet hinge here. In this case I needed to trim some out of the bottom of the bonnet, so worth playing with the pivot location.
http://matt-phoenix.blogspot.co.uk/2013 ... frame.html
Decent archive of Phoenix photos here for your perusal.
https://picasaweb.google.com/1046718180 ... directlink
Matt
http://matt-phoenix.blogspot.co.uk/2013 ... frame.html
Decent archive of Phoenix photos here for your perusal.
https://picasaweb.google.com/1046718180 ... directlink
Matt
-
philfingers
- Posts: 123
- Joined: Sat Mar 12, 2011 9:34 pm
- Name: Phil of course
- Location: Kidderminster, Worcestershire, UK
Re: It's not yellow and it's no 21 [image heavy]
thanks guys. Rob will drop you a mail when i get around to contemplating the bonnet hinge
Adrian- looks like the top end breathers system is stock. The AIS valve is in place and there's a alloy valve above that forward of the airbox that has been disconnected. I meant to get a pic but didn't.
Been working on the throttle pedal box and gear linkage today. Hopefully will be easier to drive then and will become a driving restoration/project.
STM Phoenix R1 IRS Quaiffe reverse & LSD
Sold- Sylva Striker 1660 XF, 40s live axle
Sold- Sylva Phoenix- 1300 XF, 234, 40s live axle.
205 mi16 tarmac rally car, Audi A6 2.7 TDi S-line and a few motorbikes
Sold- Sylva Striker 1660 XF, 40s live axle
Sold- Sylva Phoenix- 1300 XF, 234, 40s live axle.
205 mi16 tarmac rally car, Audi A6 2.7 TDi S-line and a few motorbikes
-
robcollingridge

- Posts: 40
- Joined: Wed Jul 01, 2009 10:35 pm
- Name: Robert Collingridge
Re: It's not yellow and it's no 21 [image heavy]
That gear linkage does look nasty. The problem with a rod linkage is that it is fixed to the car at one end and the engine (which moves a bit) at the other. A nice cable shift will provide a floating mechanism at the engine end. I had a rod linkage before and swapped to Andy Bates push-pull cable system later. I'm sure the rod-linkage was a key part in me rounding cogs because the shift was never as precise as I'd liked. The cable is a huge improvement and provides a wonderfully positive feel.
Interesting handbrake mounting!
The R1 engine needs a sump baffle and I would do this even on a road car. A long sweeping curve in the road or a large roundabout at speed will cause oil surge. This typically requires the engine out because you need to drill and tap the block to add a couple of fixing bolts (well I did with the 2003 engine).
If you take the engine out, then have a look at a remote oil filter options. This gives you a lot more flexibility on engine position but the existing propshaft length is going to limit you a bit, now that this has been fixed.
I had fitted a Yamaha race spring from new but the clutch plates were done last summer and Andy Bates fitted the Barnett conversion. This feels much better and the clutch is a lot less like a BEC and much more like a typical road car. It's less binary in action it is easier to get away. Much less chance of it slipping too.
The brakes should be fine, so long as the pipes were flared well and you have no leaks. Check the piston sizes and also use braided flexible pipes. Change the fluid and the existing calipers should be fine.
Is there a Power Commander fitted?
I used a mountain bike gear cable for the throttle on my Fury R1 and it has worked really well. The return springs at the throttle end should be enough, so long as the pedal moves freely.
I got my 2003 R1 engine under the bonnet without holes. Runs a fairly low ground clearance though and I use a filter and no air box:
You can see it all in this video: https://www.youtube.com/watch?feature=p ... WF9XHU6vR4
Rob
Rob Collingridge
http://www.robcollingridge.com/kitcar
http://www.robcollingridge.com/kitcar
-
philfingers
- Posts: 123
- Joined: Sat Mar 12, 2011 9:34 pm
- Name: Phil of course
- Location: Kidderminster, Worcestershire, UK
Re: It's not yellow and it's no 21 [image heavy]
thanks Rob for the info and comments
As per email the engine is solid mounted, well I'm pretty sure, will check tomorrow. I've redone most for the linkage, taken all the slack out of it so will see how it works now.
The handbrake, mmm yes! I just presumed it was floor mounted as it was an IRS chassis. I always like the Sylva vertical HB, might see if the brackets are all there.
The engine position looks ok and there's loads of room around the oil filter from memory. the Oil filler looks tricky to get at tho. Will post more pics tomorrow
I think the original build of the car was done right but someone has redone it with the R1 engine once the 1100 Pan' was removed. Under the back it looks really clean and reasonably well done. I haven't any concerns with the brakes. All bleed nipples came undone fine yesterday and bled ok. will check m/c size tho
no power commander fitted. the intake AIS valve is still running too. I'll hook up an oil pressure test kit tomorrow to check pressure before I start messing with baffles. motor might be goosed already, it's been around silverstone.
throttle linkage all coming together. Pedal was all loose in the pedal box, rather not loose but lots of play. Tightened all that and made a stop and a bar for the return springs today, springs should arrive tomorrow hopefully.
STM Phoenix R1 IRS Quaiffe reverse & LSD
Sold- Sylva Striker 1660 XF, 40s live axle
Sold- Sylva Phoenix- 1300 XF, 234, 40s live axle.
205 mi16 tarmac rally car, Audi A6 2.7 TDi S-line and a few motorbikes
Sold- Sylva Striker 1660 XF, 40s live axle
Sold- Sylva Phoenix- 1300 XF, 234, 40s live axle.
205 mi16 tarmac rally car, Audi A6 2.7 TDi S-line and a few motorbikes
-
philfingers
- Posts: 123
- Joined: Sat Mar 12, 2011 9:34 pm
- Name: Phil of course
- Location: Kidderminster, Worcestershire, UK
Re: It's not yellow and it's no 21 [image heavy]
well it's been a busy week. Pete's car has been sold but not without it's issues. Was basically stopping when hot. Was convinced it was valve clearances [thanks Adrian!] causing it, but I think an air lock in the top end wasn't helping as the engine was getting very hot. Anyway took the car up to Richard in Sheffield, the new owner, went for a probably 15-20 mile run in it and behaved perfectly until driving up the road to his house and started missing again. half a tank of fuel, pump was running strong. It did restart, something that it wouldn't do previously when hot. I'm sure Richard will appear on here at some point. He plans to use the car out in the peak district, it's gone to a good home
Anyway, the Phoenix. I finally got to drive it properly last night. suspension seems very good, it's IRS car on Avo's for those that don't know. I expected it to be a bit wallowy at the back [like my SEi Westfield 15 years ago] but far from it. Brakes are good. It goes like stink! What really surpised me was the tractability of the car at sort of 40-50mph in 6th, pulls a lot better than I imagined it would. Loads of noise coming from the pesky Quaiffe box. I never did much reading up on them before buying the car, imagining the Quaiffe to be a quality product. It seems it's the bad apple in their range after reading the reports and comments on it. I'm sure the bearings have gone, it makes a hell of a racket and there's quite a lot of drive train shunt too. Amazingly it doesn't appear to have lost any oil, and there's no breather on it either. Unfortunately the builder of the car didn't see the benefit in creating a cover to check the oil level. So looking at the install I just thought drops the props off, unbolt it and lift it out. not so simple, it's wider than the chassis rails, so will need to come out the front of the car, which means the engine needs to come out too. joy! Looks simple enough tho.
A few pics attached of the painted gear linkage and a bit of thought on the throttle pedal. Works much better, I welded some bosses on the side to use a more suitable barfor the pivot, added an adjustable stop for the off-throttle position and added a couple of springs which give it a nice weight.
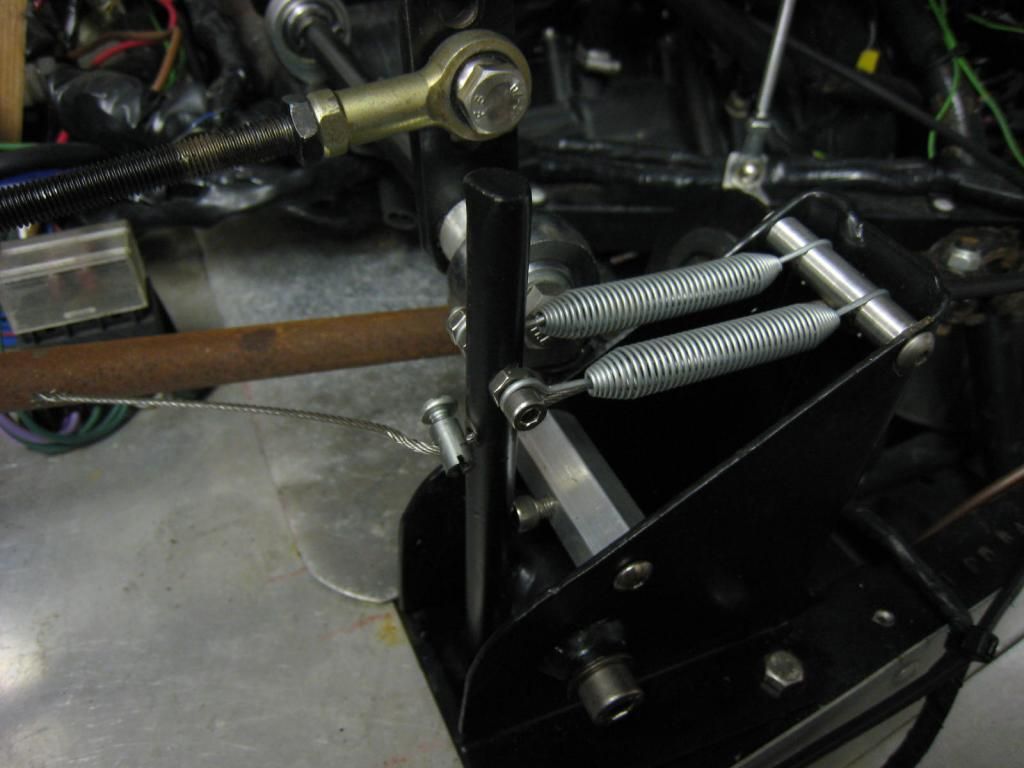
The airbox needed lifting up to stop it causing stiff throttle linkages, so this was the solution. Works perfectly
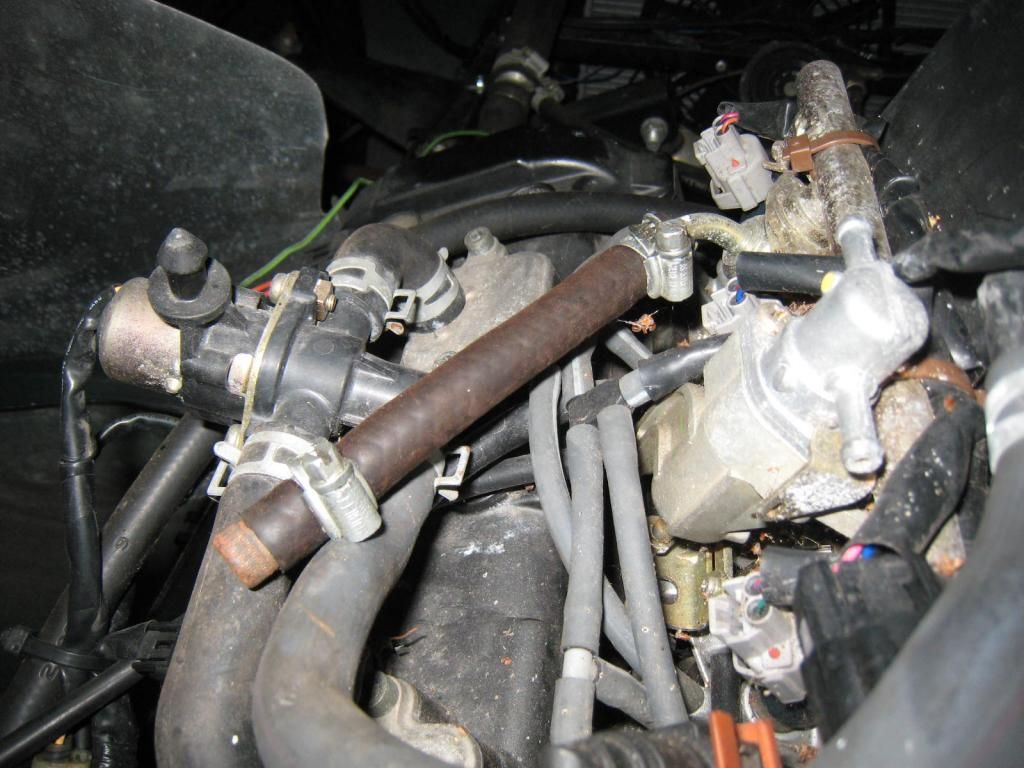
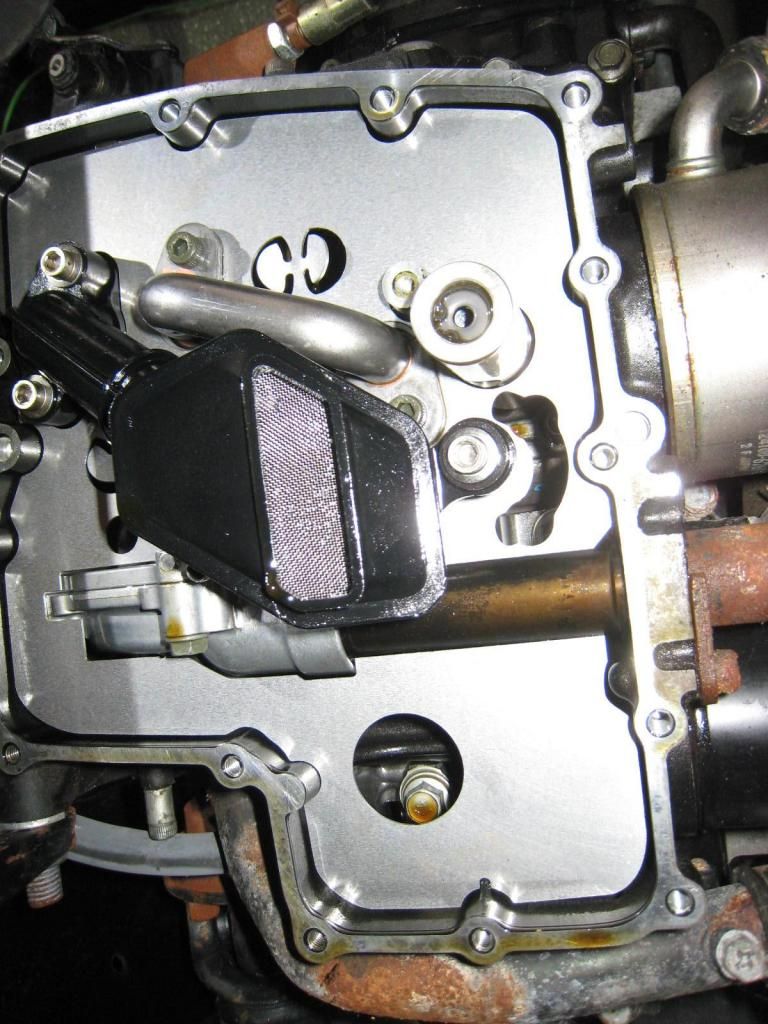
here's a picture of the cam cover. What i'd like to know is what is the silver thing on the RHS? also that blanked off hose, is that a fuel return to the tank. I know there is usually a fuel return on EFI engines.
While the engine is out for the quaiffe box work I'm going to check the sump and I suspect will end up baffling the sump. Anyone used this guy http://www.ebay.co.uk/itm/04-08-Yamaha- ... 19ef53d783
Rob- engine is definitely solid mounted and oil filter access is very easy
Other things:-
need to sort seating position, thinking about painting the car inside satin black as the ally work is a little tarnished, want a clear screen, don't like the black one. Think will end up taking the body off to redo some bits. Notably the rats next of wiring. the dash has been riveted in!
Anyway, the Phoenix. I finally got to drive it properly last night. suspension seems very good, it's IRS car on Avo's for those that don't know. I expected it to be a bit wallowy at the back [like my SEi Westfield 15 years ago] but far from it. Brakes are good. It goes like stink! What really surpised me was the tractability of the car at sort of 40-50mph in 6th, pulls a lot better than I imagined it would. Loads of noise coming from the pesky Quaiffe box. I never did much reading up on them before buying the car, imagining the Quaiffe to be a quality product. It seems it's the bad apple in their range after reading the reports and comments on it. I'm sure the bearings have gone, it makes a hell of a racket and there's quite a lot of drive train shunt too. Amazingly it doesn't appear to have lost any oil, and there's no breather on it either. Unfortunately the builder of the car didn't see the benefit in creating a cover to check the oil level. So looking at the install I just thought drops the props off, unbolt it and lift it out. not so simple, it's wider than the chassis rails, so will need to come out the front of the car, which means the engine needs to come out too. joy! Looks simple enough tho.
A few pics attached of the painted gear linkage and a bit of thought on the throttle pedal. Works much better, I welded some bosses on the side to use a more suitable barfor the pivot, added an adjustable stop for the off-throttle position and added a couple of springs which give it a nice weight.

The airbox needed lifting up to stop it causing stiff throttle linkages, so this was the solution. Works perfectly

here's a picture of the cam cover. What i'd like to know is what is the silver thing on the RHS? also that blanked off hose, is that a fuel return to the tank. I know there is usually a fuel return on EFI engines.

While the engine is out for the quaiffe box work I'm going to check the sump and I suspect will end up baffling the sump. Anyone used this guy http://www.ebay.co.uk/itm/04-08-Yamaha- ... 19ef53d783
Rob- engine is definitely solid mounted and oil filter access is very easy
Other things:-
need to sort seating position, thinking about painting the car inside satin black as the ally work is a little tarnished, want a clear screen, don't like the black one. Think will end up taking the body off to redo some bits. Notably the rats next of wiring. the dash has been riveted in!
STM Phoenix R1 IRS Quaiffe reverse & LSD
Sold- Sylva Striker 1660 XF, 40s live axle
Sold- Sylva Phoenix- 1300 XF, 234, 40s live axle.
205 mi16 tarmac rally car, Audi A6 2.7 TDi S-line and a few motorbikes
Sold- Sylva Striker 1660 XF, 40s live axle
Sold- Sylva Phoenix- 1300 XF, 234, 40s live axle.
205 mi16 tarmac rally car, Audi A6 2.7 TDi S-line and a few motorbikes
-
philfingers
- Posts: 123
- Joined: Sat Mar 12, 2011 9:34 pm
- Name: Phil of course
- Location: Kidderminster, Worcestershire, UK
Re: It's not yellow and it's no 21 [image heavy]
Well lots been going on since the last post! I've been busy converting one of the lathes to 3 phase, nothing is ever simple, the motor foot print was smaller than the old single phase one so holes wouldn't line up etc, anyway that's all working now, plenty of flexibility on speed, along with soft start and stop etc
So the Phoenix. I ordered a sump baffle plate from Jonathan Rarity http://www.ebay.co.uk/itm/111389431683? ... 1439.l2649 he hill climbs a busa powered single seater. The baffle plate came quickly, nicely made piece of kit. I decided to have a go at fitting it in the car, dropped the sump off, was easy enough, need to remove the oil line and oil pickup. the plate is then held in by these two items once they're refitted, no additional drilling of the block is required, the oil level sensor was refitted too
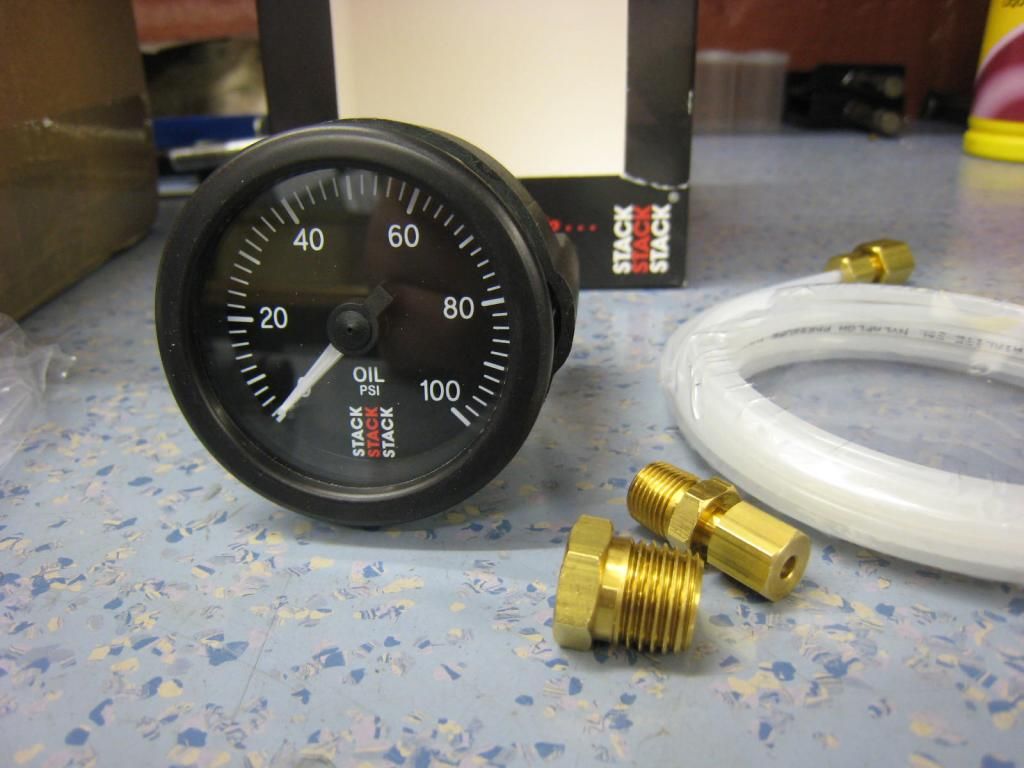
also decided to fit an oil pressure gauge, which is temporarily mounted at the moment, the dash is going to be redone at some point. Stack do a nice 100psi one for about £45 on Ebay, and it comes with the oil line too, which a lot of gauges don't include http://www.ebay.co.uk/itm/371015954367? ... 1439.l2649
I made up an adapter to T in with the Oil pressure switch which is remote mounted on a braided line. That was M10 x 1.0, the oil pressure gauge is NPT but that was easy enough as I had a tap around [FYI 1/8NPT is 27TPI but 1/8 BSP is 28TPI so if the material is soft it will 'fit'- i had the right tap tho'].

So with the sump all back on I filled the engine with oil, the window was completely full, as it was when I got the car. Upon starting it I had about 20-25psi [can't remember really] at tickover and about 90-95psi at 5k cold
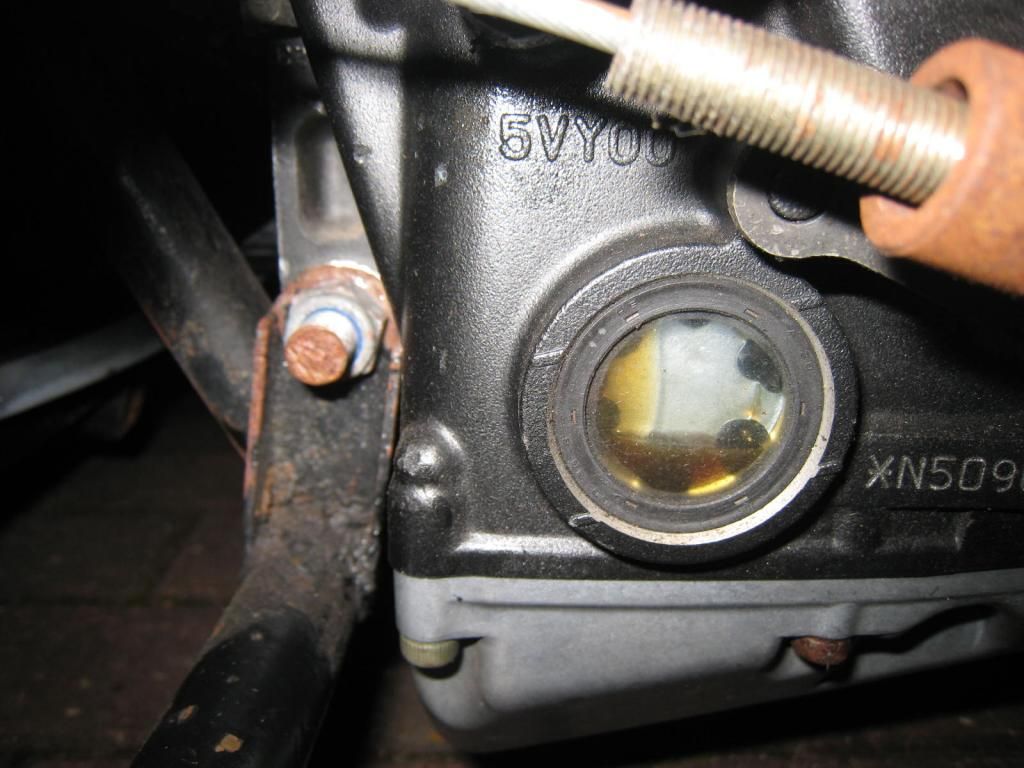
here's the oil level, noticeably lower when running, I can only assume this is due to the oil being cold and hence thicker, as it started to warm the level rose, I guess as the oil is thinner it returns to the sump quicker. At this point I noticed an oil leak!
Advice on oil level welcome, the bottom face of the block is horizontal to the ground
Following day, as I was expecting to have to remove the sump I noticed the level sensor was dripping, sure enough it was just the level sensor O ring, I had a new one anyway. Since then it's remained oil tight
So the Quaife box was next
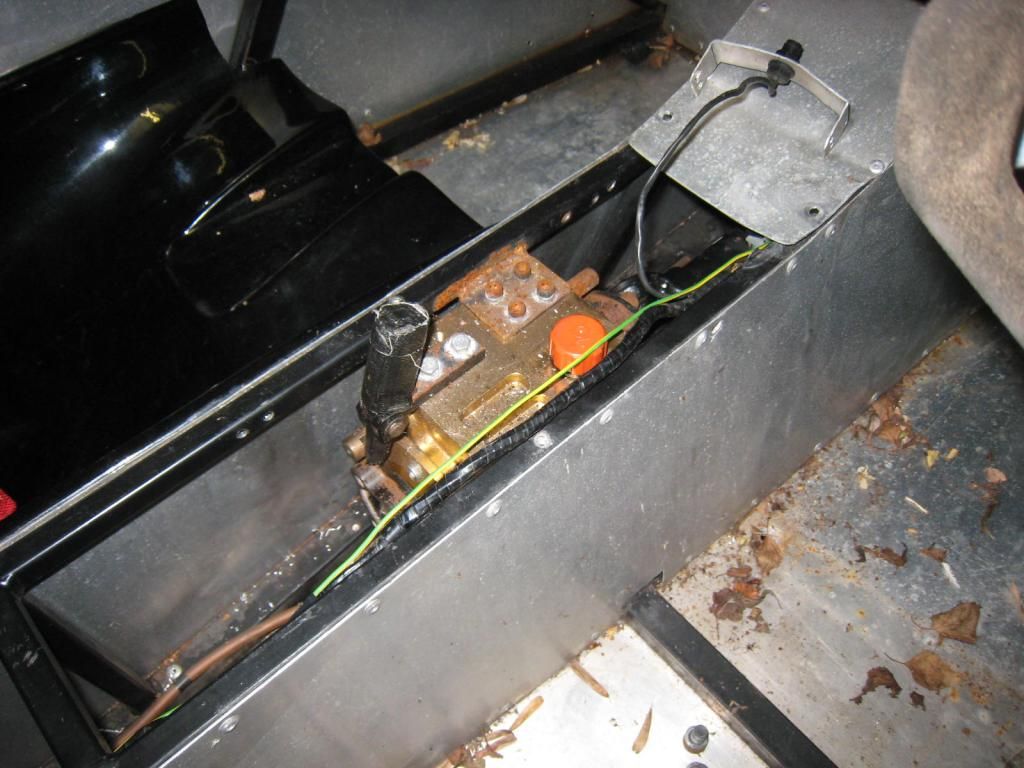
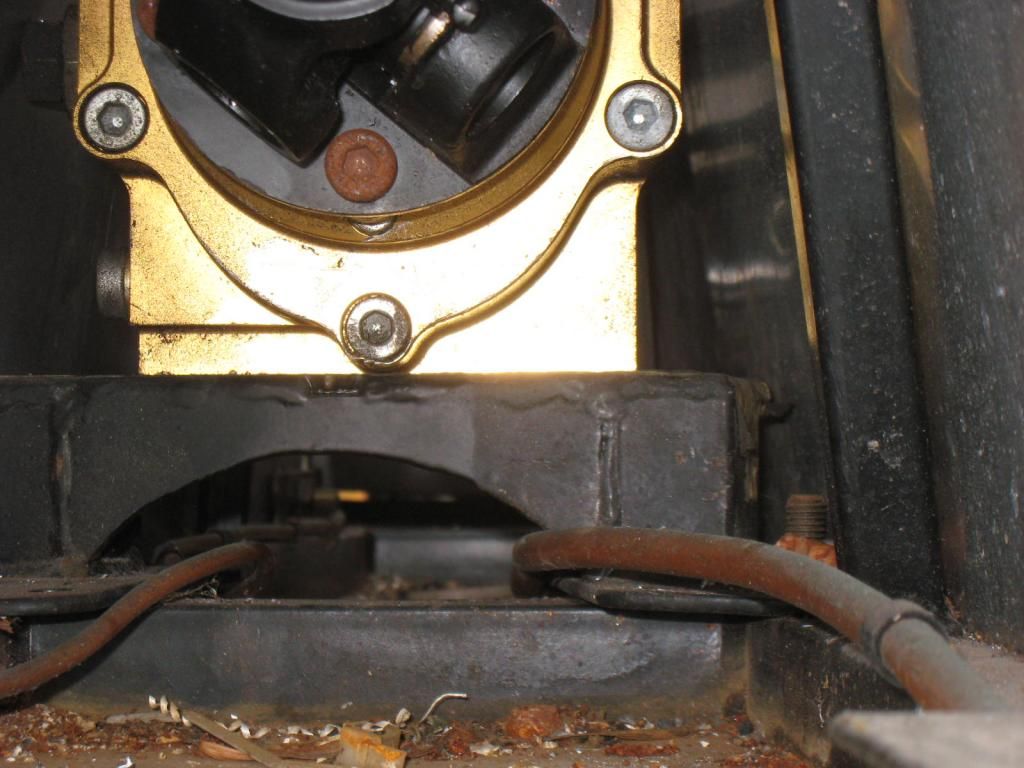
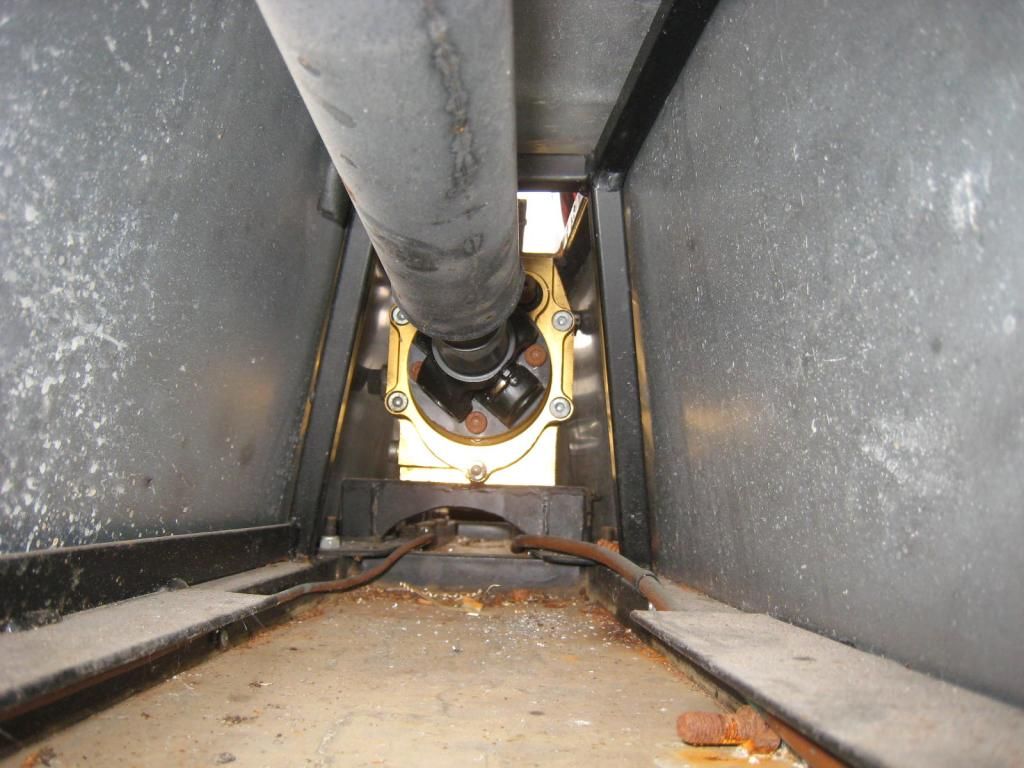
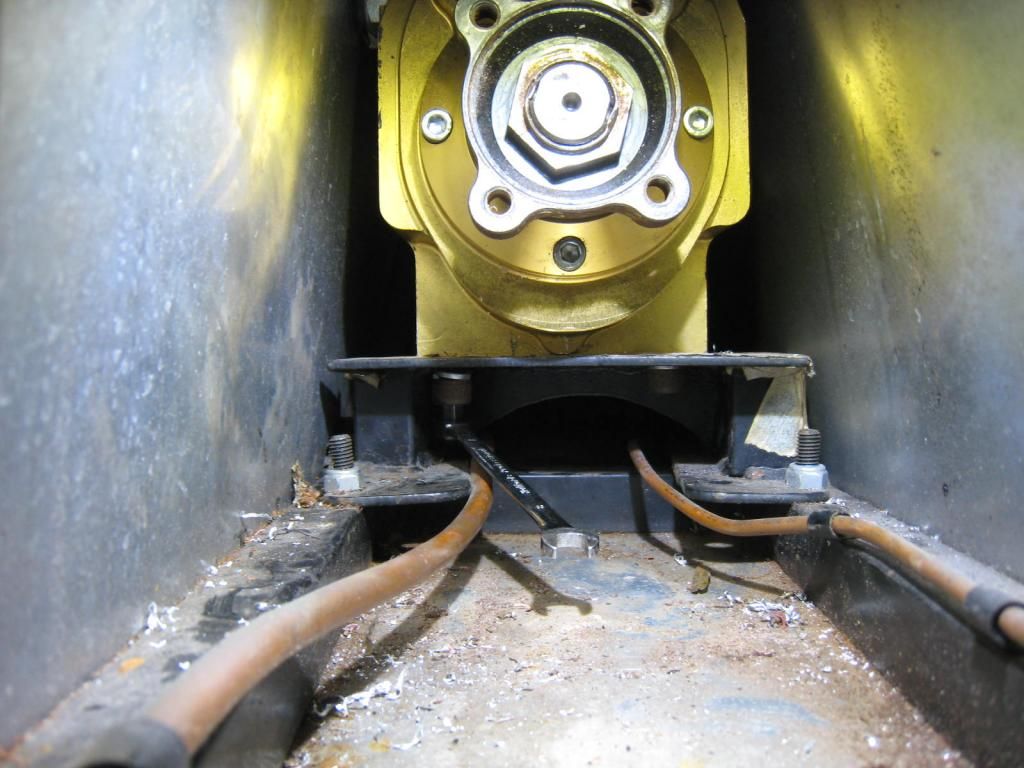
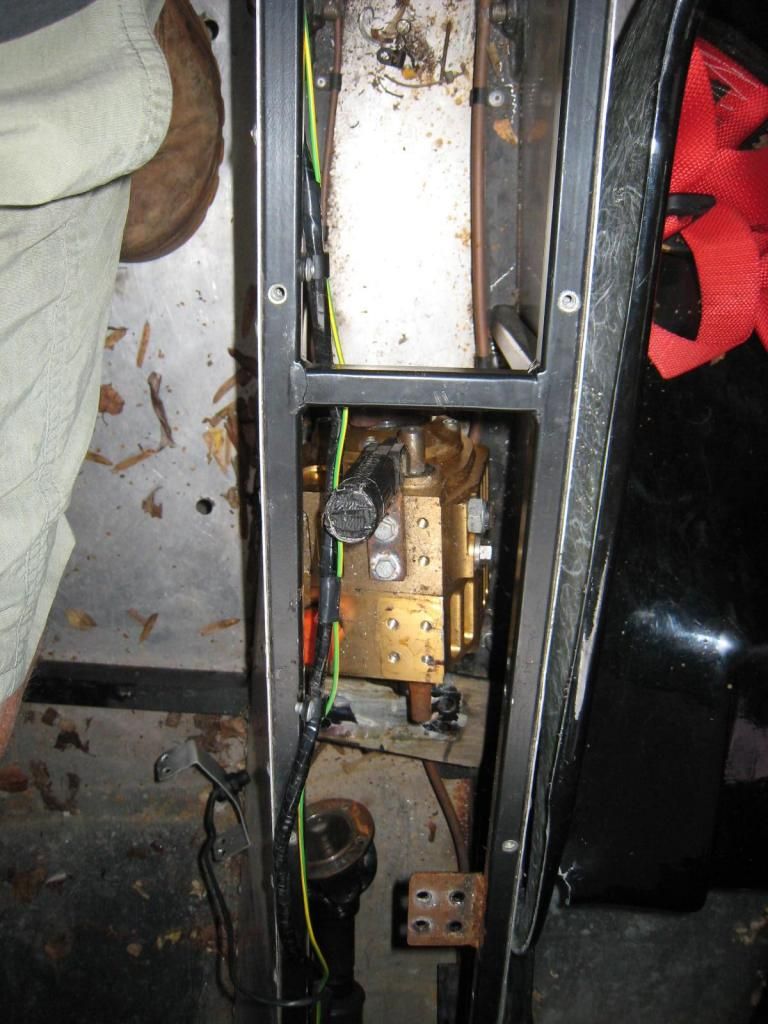
You can see whoever built the car thoughtfully put a cover plate on the drivers side of the tunnel to check/fill the box with oil!
As I now longer required to remove the engine I was a little reluctant to do this to get the reverse box out. As you can see the box is wider than the chassis rails at the top of the tunnel.
It was a swine to get out, I started with the rear proper, nice to see someone used threadlock on the bolts, even with an air ratchet took me ages as they were too tight for the air ratchet to work, and I didn't want to risk rounding the cap head off! Worse was to come, there are 4 cap head M10 bolts underneath, I cut an allen key down to get at them and loosen them, then the only way was to use the short cut off bit with an M8 ratchet ring to get them out. Of course all these wold be much easier if the builder had the forethought to put some access holes underneath!
So with bolts out it still wouldn't move. I couldn't get the front prop off, the ally panel above/forward of the box was riveted down and not enough space to get a drill it to get them out. Then I realised the expanding front prop. Once I'd pulled the box back 3" or so I could remove the front prop, easy, there wasn't any loctite!
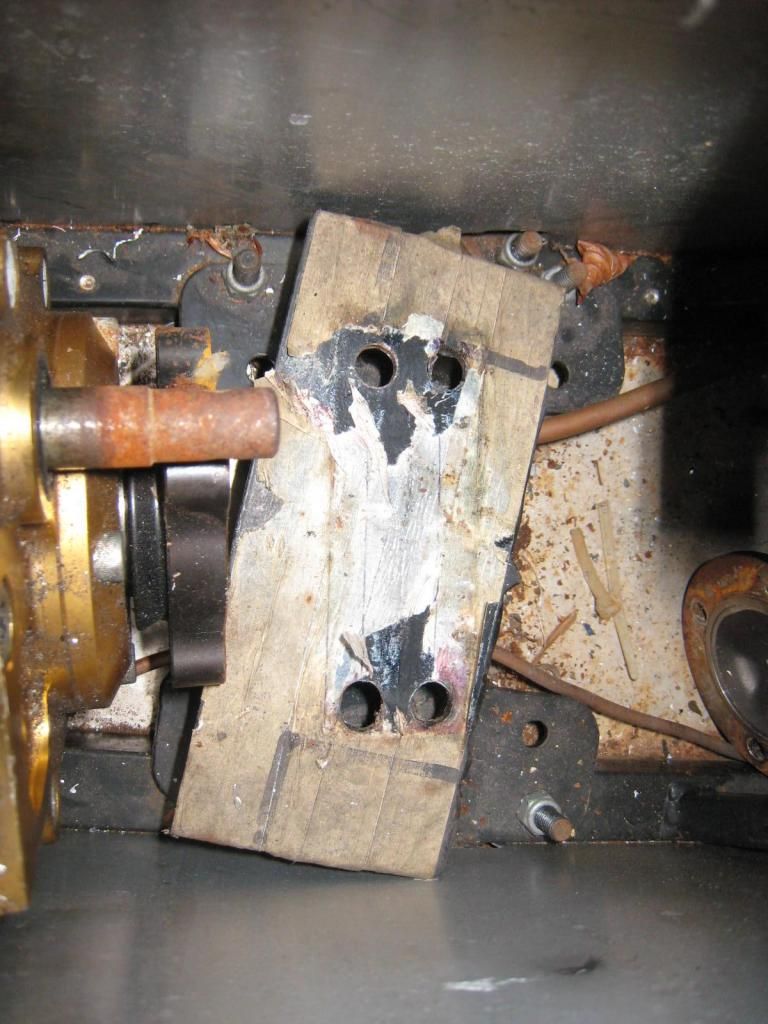
just look at that supporting bracket, it's anybody's guess as to why it was put in on the piss and not straight, someone went to the effort to powder coat it tho. SO now the conundrum as to getting the box out, This is what I did
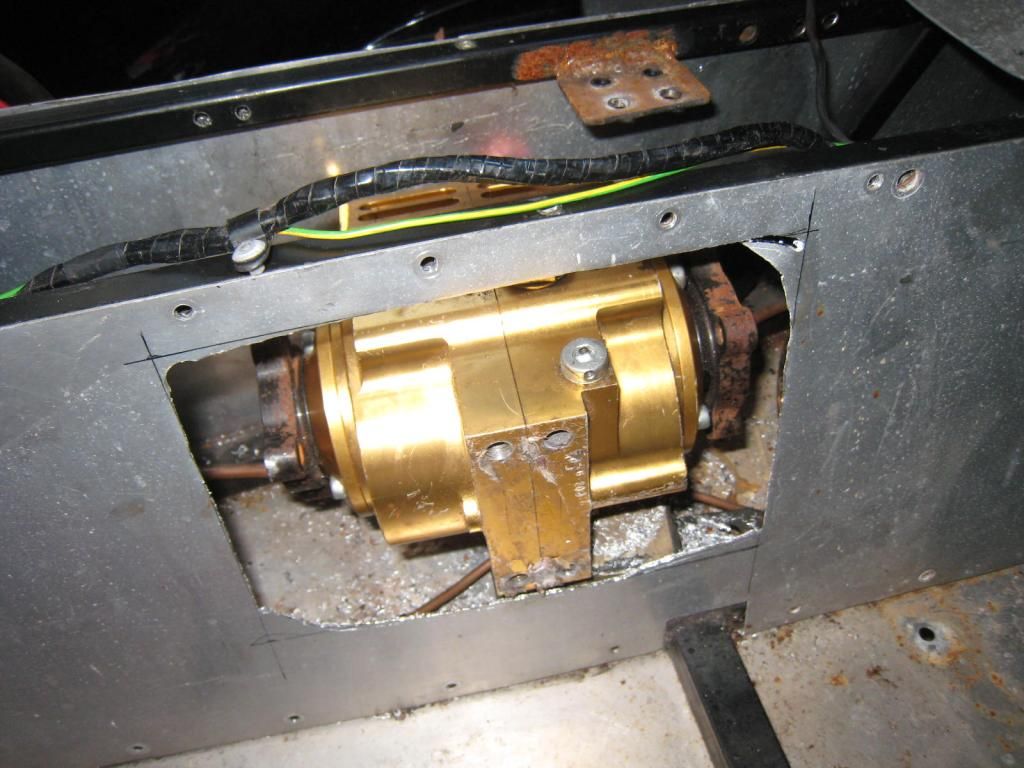
not ideal, but 5 mins marking out and 5 mins with the air nibbler and I had a hole big enough to slip the unit out.
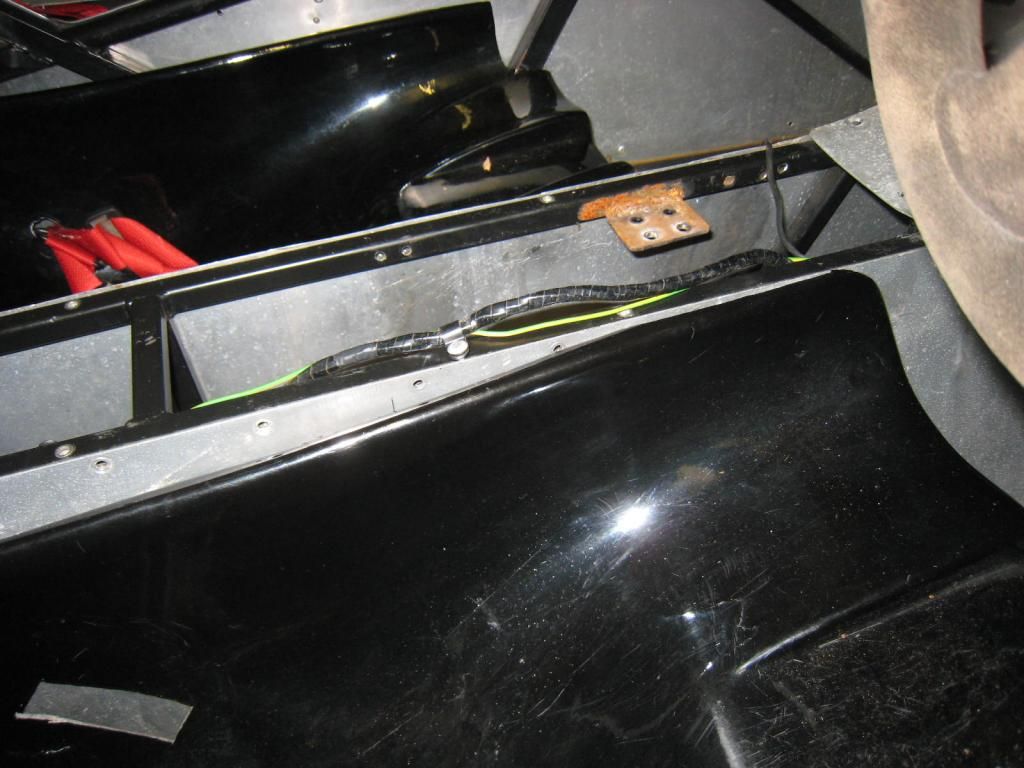
as you can see with the seat it it won't be seen,
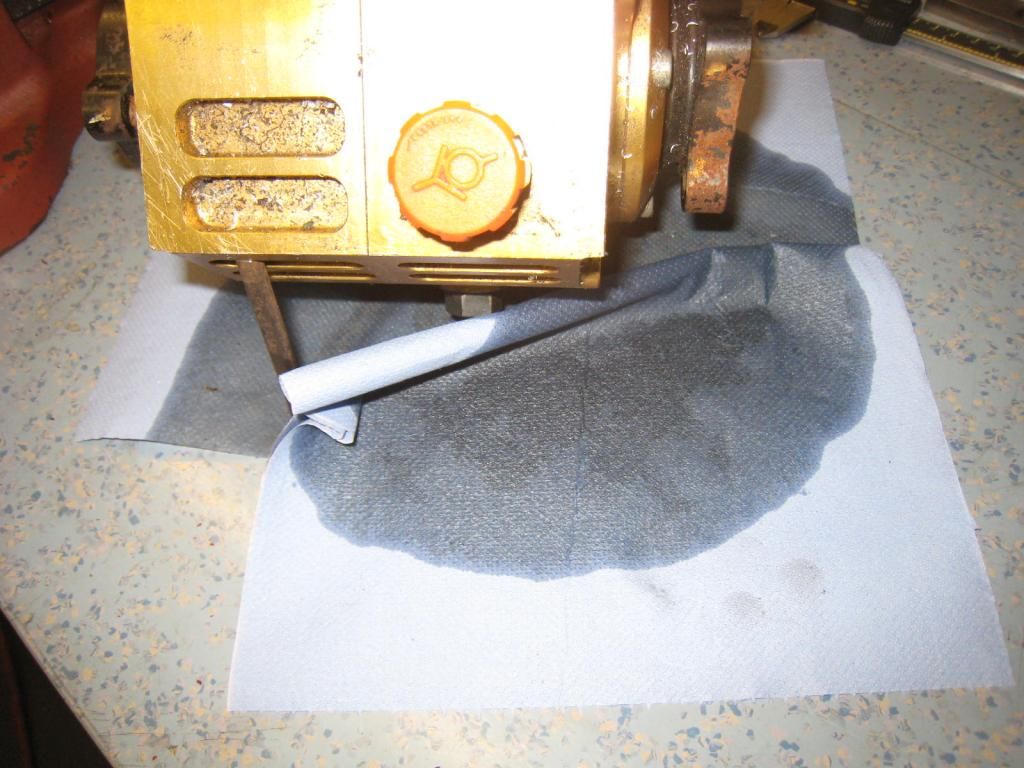
I'll make a cover plate up at some point and then at least the oil can be checked, and here in lies the problem, see below, this is the oil drained from the box in 2 hrs! Probably about 5ml! the box was empty, no evidence of any leaking, I wonder if it never has any oil in it!
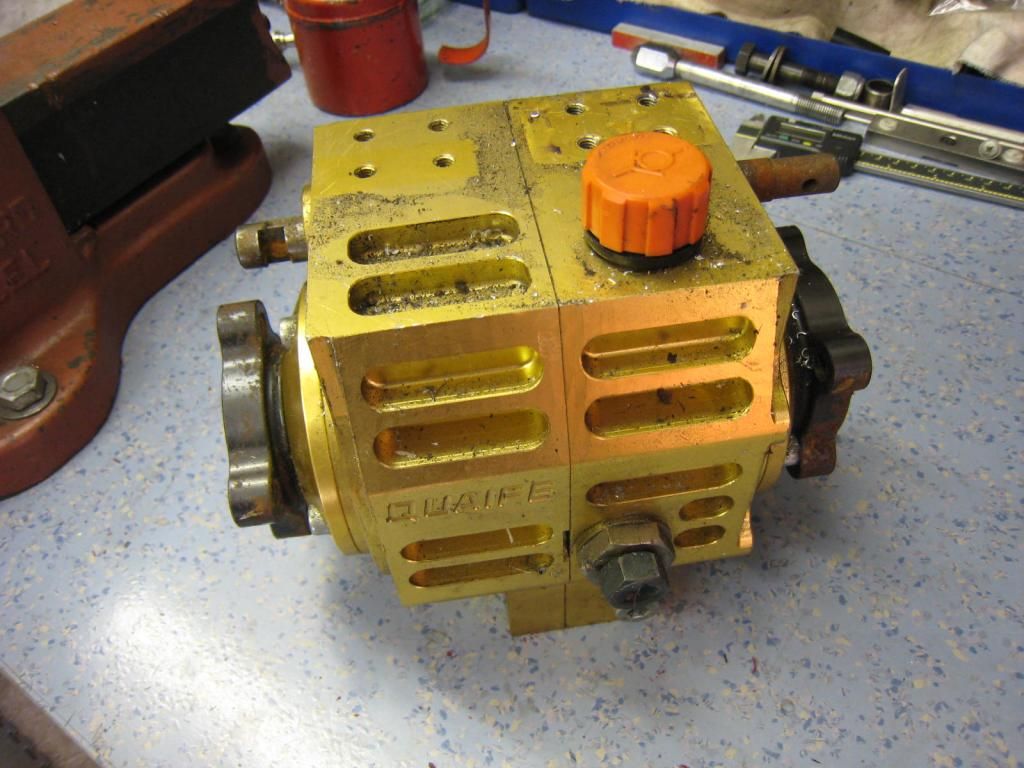
So the oil less box is on the bench. I'll cover the breaking open of the gold box tomorrow!
So the Phoenix. I ordered a sump baffle plate from Jonathan Rarity http://www.ebay.co.uk/itm/111389431683? ... 1439.l2649 he hill climbs a busa powered single seater. The baffle plate came quickly, nicely made piece of kit. I decided to have a go at fitting it in the car, dropped the sump off, was easy enough, need to remove the oil line and oil pickup. the plate is then held in by these two items once they're refitted, no additional drilling of the block is required, the oil level sensor was refitted too


also decided to fit an oil pressure gauge, which is temporarily mounted at the moment, the dash is going to be redone at some point. Stack do a nice 100psi one for about £45 on Ebay, and it comes with the oil line too, which a lot of gauges don't include http://www.ebay.co.uk/itm/371015954367? ... 1439.l2649

I made up an adapter to T in with the Oil pressure switch which is remote mounted on a braided line. That was M10 x 1.0, the oil pressure gauge is NPT but that was easy enough as I had a tap around [FYI 1/8NPT is 27TPI but 1/8 BSP is 28TPI so if the material is soft it will 'fit'- i had the right tap tho'].

So with the sump all back on I filled the engine with oil, the window was completely full, as it was when I got the car. Upon starting it I had about 20-25psi [can't remember really] at tickover and about 90-95psi at 5k cold
here's the oil level, noticeably lower when running, I can only assume this is due to the oil being cold and hence thicker, as it started to warm the level rose, I guess as the oil is thinner it returns to the sump quicker. At this point I noticed an oil leak!

Advice on oil level welcome, the bottom face of the block is horizontal to the ground
Following day, as I was expecting to have to remove the sump I noticed the level sensor was dripping, sure enough it was just the level sensor O ring, I had a new one anyway. Since then it's remained oil tight
So the Quaife box was next

You can see whoever built the car thoughtfully put a cover plate on the drivers side of the tunnel to check/fill the box with oil!
As I now longer required to remove the engine I was a little reluctant to do this to get the reverse box out. As you can see the box is wider than the chassis rails at the top of the tunnel.


It was a swine to get out, I started with the rear proper, nice to see someone used threadlock on the bolts, even with an air ratchet took me ages as they were too tight for the air ratchet to work, and I didn't want to risk rounding the cap head off! Worse was to come, there are 4 cap head M10 bolts underneath, I cut an allen key down to get at them and loosen them, then the only way was to use the short cut off bit with an M8 ratchet ring to get them out. Of course all these wold be much easier if the builder had the forethought to put some access holes underneath!
So with bolts out it still wouldn't move. I couldn't get the front prop off, the ally panel above/forward of the box was riveted down and not enough space to get a drill it to get them out. Then I realised the expanding front prop. Once I'd pulled the box back 3" or so I could remove the front prop, easy, there wasn't any loctite!


just look at that supporting bracket, it's anybody's guess as to why it was put in on the piss and not straight, someone went to the effort to powder coat it tho. SO now the conundrum as to getting the box out, This is what I did

not ideal, but 5 mins marking out and 5 mins with the air nibbler and I had a hole big enough to slip the unit out.
as you can see with the seat it it won't be seen,

I'll make a cover plate up at some point and then at least the oil can be checked, and here in lies the problem, see below, this is the oil drained from the box in 2 hrs! Probably about 5ml! the box was empty, no evidence of any leaking, I wonder if it never has any oil in it!


So the oil less box is on the bench. I'll cover the breaking open of the gold box tomorrow!
STM Phoenix R1 IRS Quaiffe reverse & LSD
Sold- Sylva Striker 1660 XF, 40s live axle
Sold- Sylva Phoenix- 1300 XF, 234, 40s live axle.
205 mi16 tarmac rally car, Audi A6 2.7 TDi S-line and a few motorbikes
Sold- Sylva Striker 1660 XF, 40s live axle
Sold- Sylva Phoenix- 1300 XF, 234, 40s live axle.
205 mi16 tarmac rally car, Audi A6 2.7 TDi S-line and a few motorbikes
-
dopdog

- Posts: 934
- Joined: Tue May 04, 2010 6:50 am
- Name: Simon Boulter
- Location: Oxfordshire
Re: It's not yellow and it's no 21 [image heavy]
HI Phil,
with regards to the oil level it does drop when the engine is running. On my single seater I would slightly overfill it by running the engine at 3000rpm then topping the oil to the top of the site. I did run a flat sump the same as you. I know some people do not like to do this but I never had an issue with regards to power of oil failure.
with regards to the oil level it does drop when the engine is running. On my single seater I would slightly overfill it by running the engine at 3000rpm then topping the oil to the top of the site. I did run a flat sump the same as you. I know some people do not like to do this but I never had an issue with regards to power of oil failure.
Return to “Jeremy Philips Cars”
Who is online
Users browsing this forum: No registered users and 1 guest