As some of you will have read elsewhere, I had an unplanned "off road" trip in June of this year, well, the car was returned from [url]http://www.option1sportscars.co.uk//url] who did a fantastic job, the car looks better than ever, and is now resplendent in Mercedes Moonstone yellow . It was while the car was away that I decided on my "Winter Mods" for this year, and one that had been queueing up for some time had been a conversion to fuel injection. I had previously put it on the back burner since I built the car, as I originally had a Weber alpha ignition only system with 45 dcoe's. When the Alpha system died two years ago, I converted to a megasquirt and wasted spark. Last year saw me ironing out a few problems with the ignition, the car would start fine, and had a stable idle, but the longer it ran, the rougher it became. Eventually the fault was tracked down to a duff coil pack from the breakers yard, and a brand new one for £10 on fleabay saw all my problems resolved.
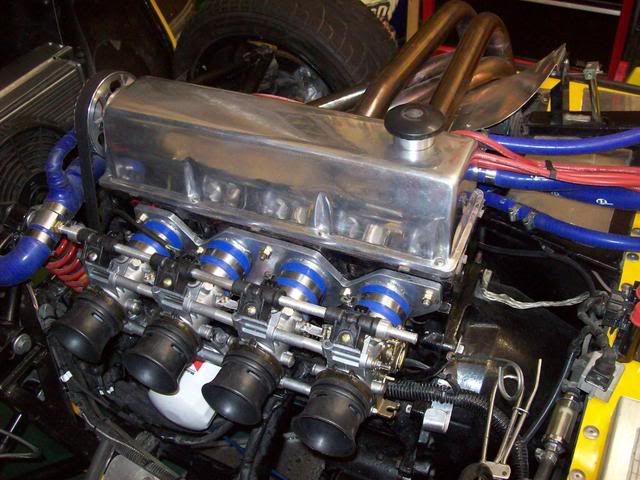
Now I have a management system capable of running fuelling I had no excuse not to go the "EFI" route, so the planning began. I did think for a long time about using one of the new alpha throttle body kits which would be a straight swap for my carbs as they are basically throttle body versions of the DCOE. these looked like they would accept my current TPS, and would use my existing trumpets, come complete with injectors, fuel rail and hoses, so were a "bolt on" option.
I was however, impressed with the job that Neil Everett did (see[url]http://www.mymojo.co.uk/index.htm/url]converting his Mojo, and when my wife agreed to an early Xmas present, and let me spend some beer tokens on a lathe (with the promise of replacing the kitchen next year) i decided to go the GSXR throttle body route. Hence the reason for this thread. I thought i might do a bit of a "blog" about the build, as it may be useful to someone else, and I may just get a few hints and tips along the way. So far I have assembled almost all I need for the project from fleabay, fuel pump, throttle bodies and pressure regulator are all in my garage awaiting fitting to the fury.
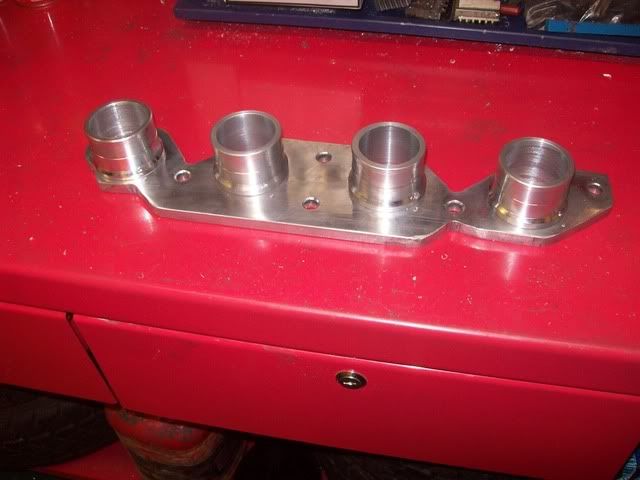
So to the first Job, the manufacture of a new inlet manifold. So far I've machined some stubs out of some 2 1/4" ally bar, and made up a manifold plate, ready to bolt to the head. All that remains to be done to this is to weld it up, a task which should be done by the end of the week.
First I began machining a piece of 100mm x 10mm ally bar,
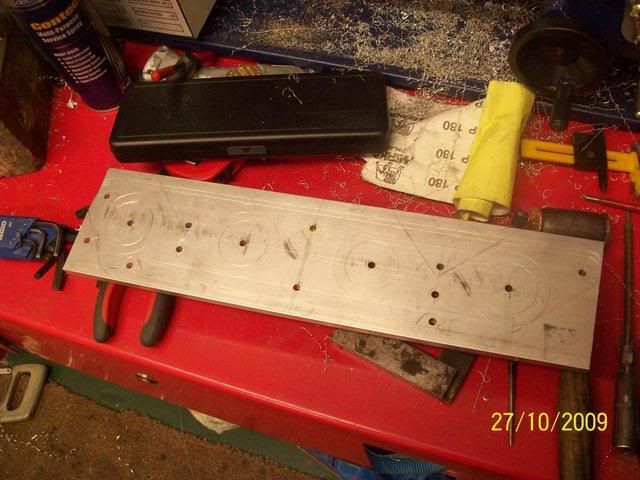
Once all the holes were cut, I then trimmed the bar back to the correct shape,
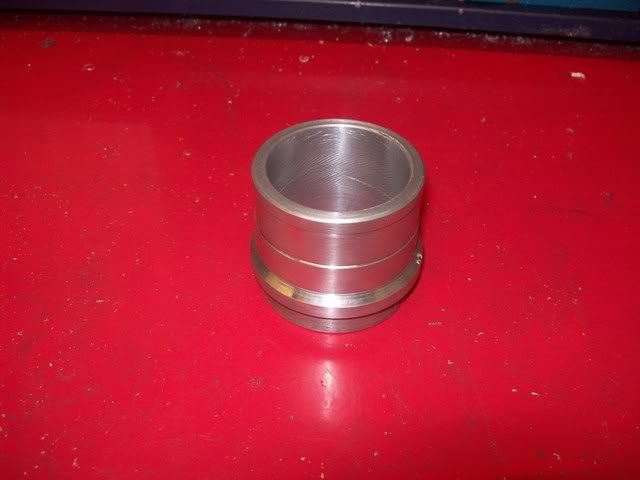
The first of the stubs these are machined to match the internal diameters of the throttle bodies and the inlet ports on the head.
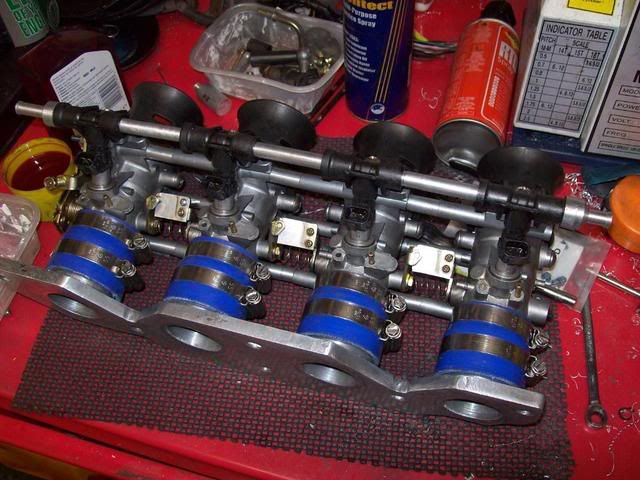
All pieces in place !
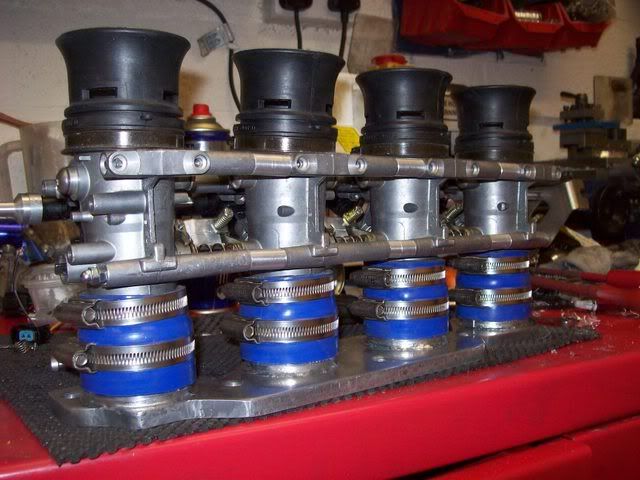
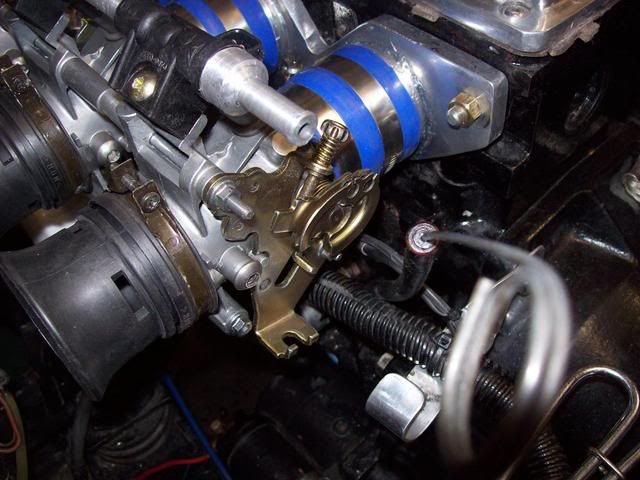
GSXR throttle bodies.
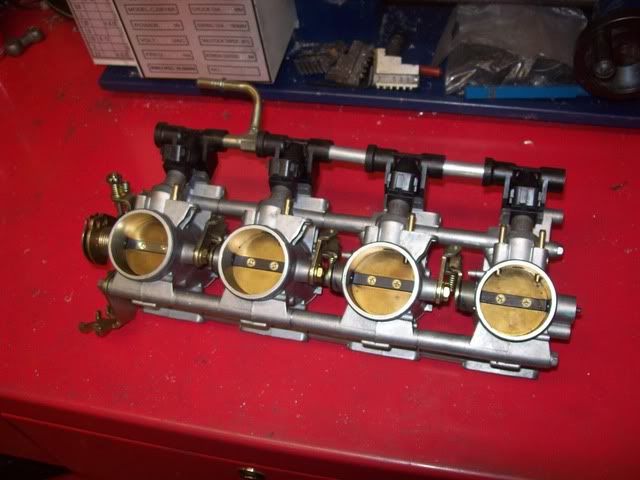
I need to part these next and then machine some spacers to re space them to the correct distance, (101mm centres)
I'll hopefully have some more progress news by the end of the weekend, Neil, if you could pop round, I would love a peek at your fuel rail to see how the through flow connections have been done.
All comments gratefully received, i've a long way to go yet!
Pinto Fuel injection upgrade Updated 10th April 2010!
- Timbo
- Posts: 80
- Joined: Mon Jul 06, 2009 11:22 pm
- Name: Tim King
- Location: Solihull
Pinto Fuel injection upgrade Updated 10th April 2010!
Last edited by Timbo on Sat Apr 10, 2010 2:53 pm, edited 8 times in total.
Don't put tomato ketchup on your salad cream sandwiches. It spoils the taste of the chocolate spread.
- NeilEverett
- Posts: 255
- Joined: Wed Jul 01, 2009 12:47 pm
- Name: Neil Everett
- Location: Warwick
- Contact:
Re: Pinto Fuel injection upgrade
Great stuff Tim, I'm now going to be thinking of things you can make for me on the lathe...
Drop me a mail to let me know when would be a good time to pop over...
Neil
Drop me a mail to let me know when would be a good time to pop over...
Neil
- MattD
- Posts: 158
- Joined: Wed Jul 01, 2009 11:07 pm
- Name: Matt Downes
- Location: Liphook, Hampshire, UK
Re: Pinto Fuel injection upgrade
I was more along the lines of... What lathe shall I get the wife to buy for the workshop's xmas present
-
- Posts: 3
- Joined: Tue Oct 27, 2009 10:35 am
- Name: rojar banks
Re: Pinto Fuel injection upgrade
This is a pretty good upgrade man......
I would like to do this for my car... this is a great stuff....
This is a art u made on lathe man..this is a nice work of the stubs that are machined to match the internal diameters of the throttle bodies and the inlet ports on the head.I would also interested to see how the through flow connections have been done.
- adithorp
- Posts: 1198
- Joined: Thu Jul 02, 2009 8:26 am
- Name: adrian thorp
- Location: Hyde, Manchester
Re: Pinto Fuel injection upgrade
"...I was more along the lines of... What lathe shall I get the wife..."
Isn't this what you meant Matt?
adrian
Isn't this what you meant Matt?
adrian
- Timbo
- Posts: 80
- Joined: Mon Jul 06, 2009 11:22 pm
- Name: Tim King
- Location: Solihull
Re: Pinto Fuel injection upgrade
Well, after a few evenings work, it all came together. I decided to "weld" the stubs to the plate using alloy brazing rods. I've used these before with some success, the trick is to heat the metal and not the rods, and scrub the joints with a stainless steel abrader to remove aluminium oxide from the surface. I used a stainless wire rod to continually abrade the joint whilst brazing,to ensure a good weld. As an additional measure, I also drilled and tapped from the rear face into the stub, and pinned them to the manifold plate. I think that if I do get a failure on a stub, then I will mechanically fix them through the plate edge to the stub, there's plenty of meat to do this, and the gasket is the bit that seals the stub face to the head. I then proceeded to make the spacers, an additional 22mm needed adding to the bodies to put them to the correct centres.The whole lot is then held together with three long 5mm rods, threaded on each end. The original set up also has an additional set of butterflies, these are surplus to requirements, so i tapped the spindle hole with an M8 thread and screwed in some suitably shortened bolts with a coating of thread loc.
This complete, I then turned my attention to modifying the fuel rail and converting it to through flow and correct spacing. The spacing was the easy bit, I just machined the new tubes to the correct length and refitted the "O"rings. The ends were a little more difficult.
The standard set up on the bike is a tee piece into the rail, with the ends blanked off. I opened the flow by drilling through the the plastic fittings and then tapped an M12 thread into this, leaving it around 6mm short of the bottom. I made up the ends with an "O"ring to sit in this blank end, which then screws into the plastic fitting.
The throttle linkages also need modifying so that all the butterflies continue to work together. I used a bit of ally angle, which I stepped to keep it in the same plane as the original and then drilled and tapped the original pad with an M3 and fixed the angle to this using the redundant screws from the discarded butterflies.
I also during this time blanked off a redundant vacuum tube connection, cutting it of flush and filling the hole with solder. A test of the injectors also proved that two of them were stuck ,but a couple days soaking in injector cleaner soon got them moving.
The whole assembly is now fitted to the head, and looks fantastic. It was lucky that the e bay throttle body win also included the air box, which come with a nice set of rubber trumpets, Perfect! I will reuse these inside the new air box.
The next couple of photo's show the TPS switch and the cable mount, both original items. If anyone knows which cable is which for the TPS, please speak up! As the Megasquirt will use TPS signals and MAP, I will be using both of these when i set the car up.
Next steps will be to install the fuel return line, pump and filter. More info soon!
Don't put tomato ketchup on your salad cream sandwiches. It spoils the taste of the chocolate spread.
- MattD
- Posts: 158
- Joined: Wed Jul 01, 2009 11:07 pm
- Name: Matt Downes
- Location: Liphook, Hampshire, UK
Re: Pinto Fuel injection upgrade
adithorp wrote:"...I was more along the lines of... What lathe shall I get the wife..."
Isn't this what you meant Matt?
adrian
If you'd met my version of SWMBO, you'd know she'd by using a lathe as a doorstop. Mechanical Ability = 0
Nice Work, Timbo
- NeilEverett
- Posts: 255
- Joined: Wed Jul 01, 2009 12:47 pm
- Name: Neil Everett
- Location: Warwick
- Contact:
Re: Pinto Fuel injection upgrade Updated!
Good progress Tim! Good that you got that injector working.
Re the TPS, I have these instructions saved from when I did my TB conversion:
Stick a multimeter across any two of the three wires (or pins in the connector) and measure ohms resistance - move the throttle and as the ohms change you have either the live/signal or earth/signal, if no change you have live/earth - you should be able to work out live and earth from the way the ohms increase or decrease I think (throttle close to open - ohms increase you have earth and signal I think, if ohms decrease you have live/signal) - connect it up and use the output on the emerald ecu to check you have the + and -ve the right way round.
- Timbo
- Posts: 80
- Joined: Mon Jul 06, 2009 11:22 pm
- Name: Tim King
- Location: Solihull
Re: Pinto Fuel injection upgrade Updated!
I would think that the black wire would be the earth, surely some of you BEC boys out there can confirm?
Don't put tomato ketchup on your salad cream sandwiches. It spoils the taste of the chocolate spread.
- petercoll
- Posts: 534
- Joined: Tue Jun 02, 2009 9:51 pm
- Name: Peter Collingridge
- Location: Shropshire
Re: Pinto Fuel injection upgrade Updated!
Blimey, that's coming along fast Tim. Do you do commissions
Pete
Pete
Return to “Jeremy Philips Cars”
Who is online
Users browsing this forum: No registered users and 10 guests