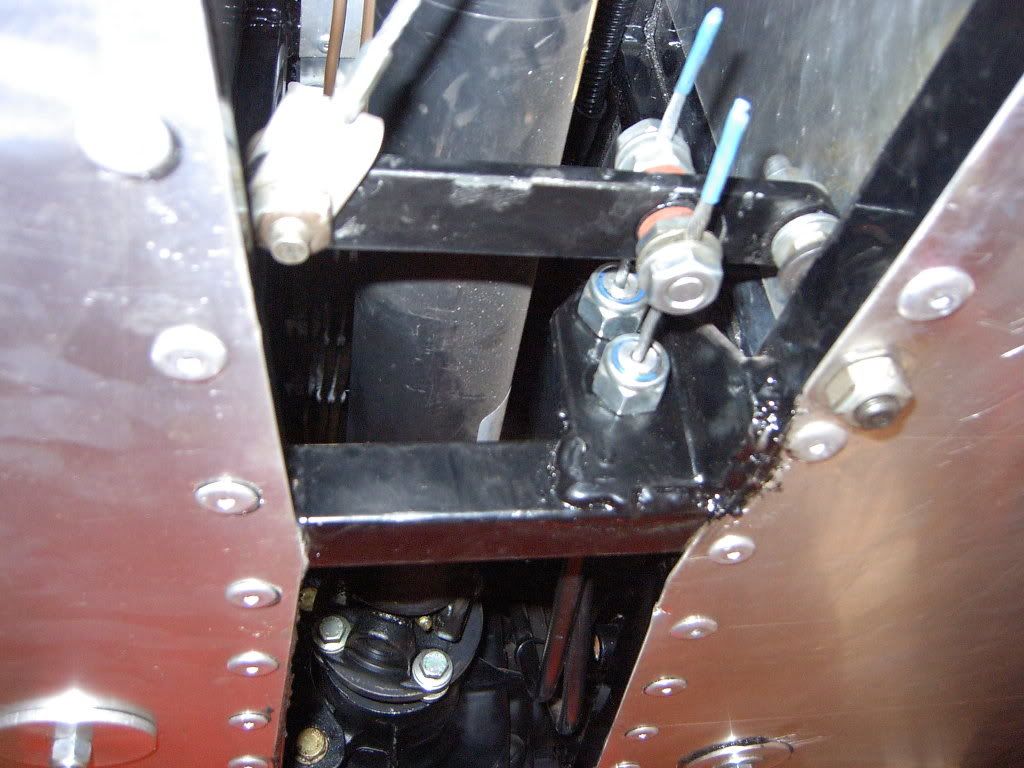
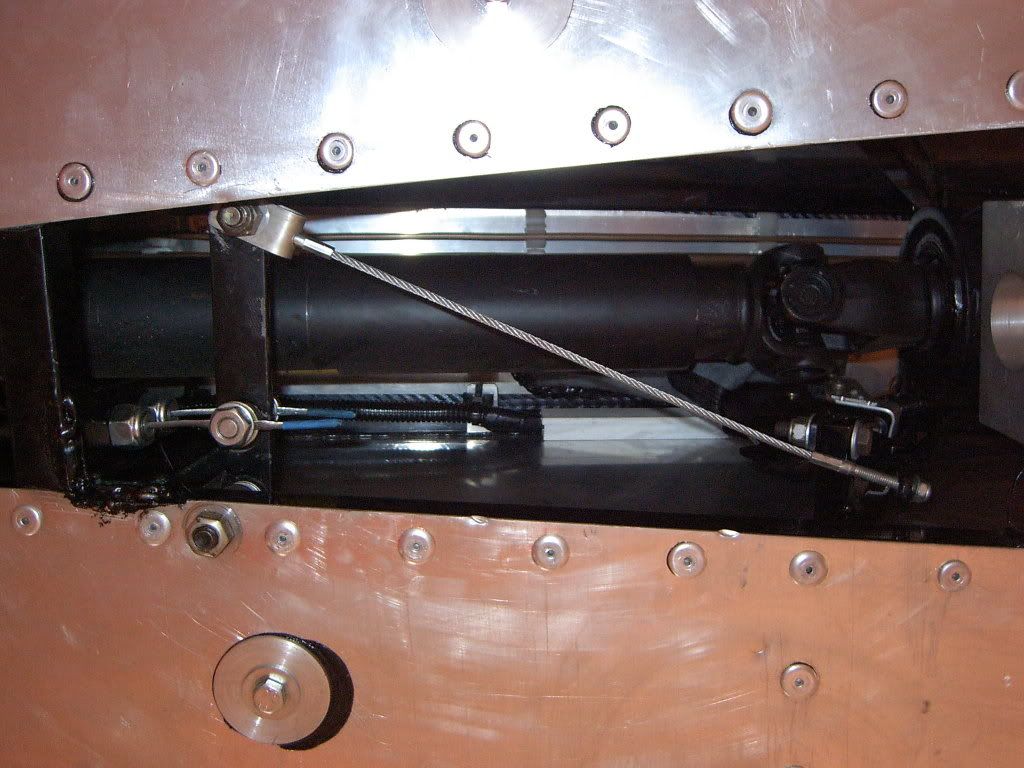
Hi Paul, fortunately I noticed the powder coating problems before I started to go any further, so I just took it back to them and it was re-coated. Looks OK now.
Have you been out in your car since the weather has perked up?
Did you have the car 4 wheel aligned after the build, I'd be interested in the settings if you did.
Thanks,
Keith.
Sylva J15 Build
-
kdempsie
- Posts: 76
- Joined: Sat Jul 04, 2009 10:28 pm
- Name: Keith Dempsie
- Location: Aberdeen
-
Paul AS
- Posts: 45
- Joined: Sun Sep 18, 2011 6:14 pm
- Name: Paul Smith
Re: Sylva J15 Build
Hi Keith,
I was back on the road on 1st March, after a new front clamshell, radiator etc over the winter. Damn those Oulton Park barriers! The weather is still pants though!!
I did have a set up done locally, but tbh I'm not convinced it was much better than I could do myself. I'm booked in at Pro Comp an early May for the works! I'll post the results when I get them.
Good result getting it re-coated. On my new build I'll be following the same path of welding brackets first, powdercoating later.
Paul
-
kdempsie
- Posts: 76
- Joined: Sat Jul 04, 2009 10:28 pm
- Name: Keith Dempsie
- Location: Aberdeen
Re: Sylva J15 Build
Good evening folks. So the build continues, as I mentioned before I planned to use a new engine and get the gearbox reconditioned as new. I sent the gearbox off to Road and Race Transmissions in Kent, I've used them before and was happy with their work and service. I had a couple of conversations with them about what the best options were. Because I wanted the option to add more power later and to be sure of reliability, I took their advice to add a Quaife ATB diff as I understand that this is the weak point of this gearbox. I also had the cases vapour blasted to make them look new, it was only an extra £50 and really has made a great job of the cases, they really look like new. In order to try and give the engine a nice free revving nature I fitted a Titan Engineering lightweight flywheel that I bought from Pumabuild. Hopefully the flywheel and throttle body fuel injection will make it responsive.
The picture below shows the engine and gearbox just delivered. I went a wee bit OCD and replaced the bolts on the fifth gear cover with stainless socket head cap screws, I had decided to use stainless anywhere it was possible to try and keep the car looking good in the future.

The powder coating was redone on the chassis along with the panels and I got started with the rolling chassis build. This stage usually goes satisfyingly quickly,but not quite so this time since I have created a rod for my own back by deviating from the normal spec a bit. The most significant of those was choosing to use Wilwood brakes all round and the stainless steel brake lines. The front brakes were straight forward enough, a kit from RallyDesign sorted that. The rear was a bit more complicated as I had to design the rear caliper mounting brackets myself.


So they don't look much now but they took a while between design and manufacture. I'm quite pleased with them now. I am a bit concerned with the run out on the rear discs though, I will get a dial gauge on them to check my eyes aren't out of calibration.
More soon.
The picture below shows the engine and gearbox just delivered. I went a wee bit OCD and replaced the bolts on the fifth gear cover with stainless socket head cap screws, I had decided to use stainless anywhere it was possible to try and keep the car looking good in the future.

The powder coating was redone on the chassis along with the panels and I got started with the rolling chassis build. This stage usually goes satisfyingly quickly,but not quite so this time since I have created a rod for my own back by deviating from the normal spec a bit. The most significant of those was choosing to use Wilwood brakes all round and the stainless steel brake lines. The front brakes were straight forward enough, a kit from RallyDesign sorted that. The rear was a bit more complicated as I had to design the rear caliper mounting brackets myself.


So they don't look much now but they took a while between design and manufacture. I'm quite pleased with them now. I am a bit concerned with the run out on the rear discs though, I will get a dial gauge on them to check my eyes aren't out of calibration.
More soon.
Last edited by kdempsie on Mon Apr 07, 2014 4:20 am, edited 2 times in total.
-
kdempsie
- Posts: 76
- Joined: Sat Jul 04, 2009 10:28 pm
- Name: Keith Dempsie
- Location: Aberdeen
Re: Sylva J15 Build
Folks, have I hosted those pictures correctly now on photobucket? Seems a bit less slick this way, have I made a mistake? Edit - worked it out!
I'm in Houston just now working for a couple of weeks so I took the opportunity to go to a car meeting on Saturday morning. It was pretty interesting http://coffeeandcarshouston.com/ and I took a few picture of the cars there. They ranged from all the usual supercars, custom cars and a few kit cars. At least I thought the Cobras were kits, I'm no expert on Cobra kits and there was enough serious metal there for them to be real!
If you have a look at the photobucket images, this one stood out!
http://s1025.photobucket.com/user/kdempsie/library/?sort=3&page=1

I genuinely thought it might be broken so I had to take a look at the other side!
Keith.
I'm in Houston just now working for a couple of weeks so I took the opportunity to go to a car meeting on Saturday morning. It was pretty interesting http://coffeeandcarshouston.com/ and I took a few picture of the cars there. They ranged from all the usual supercars, custom cars and a few kit cars. At least I thought the Cobras were kits, I'm no expert on Cobra kits and there was enough serious metal there for them to be real!
If you have a look at the photobucket images, this one stood out!
http://s1025.photobucket.com/user/kdempsie/library/?sort=3&page=1

I genuinely thought it might be broken so I had to take a look at the other side!
Keith.
-
Paul AS
- Posts: 45
- Joined: Sun Sep 18, 2011 6:14 pm
- Name: Paul Smith
Re: Sylva J15 Build
Lovely piece of design and fabrication - very envious! I stuck with the standard set up of spitfire calipers on solid discs up front, with sierra rears and to start with, even used std road pads. I never ran out of stopping power or overheated them on track. I've since uprated the front pads to green stuff and the bite from cold is tremendous, but it now has the ability and desire to lock up with what seems like relatively low pedal pressure.
It's gonna have to be better tyres for me next!!
It's gonna have to be better tyres for me next!!
- NeilEverett
- Posts: 259
- Joined: Wed Jul 01, 2009 12:47 pm
- Name: Neil Everett
- Location: Warwick
- Contact:
Re: Sylva J15 Build
Interesting read, thanks Keith!
- peter030371
- Posts: 451
- Joined: Wed Jul 01, 2009 1:37 pm
- Name: Peter Smith
- Location: Hawkhurst
Re: Sylva J15 Build
What size wheel are you going to use on the rear? I wonder if those calipers will fit inside a 13" wheel....
Editor of 'The Proper Job'
- adithorp
- Posts: 1200
- Joined: Thu Jul 02, 2009 8:26 am
- Name: adrian thorp
- Location: Hyde, Manchester
Re: Sylva J15 Build
I've got those calipers on the rear of my Fury with Compomotive CXR 13s. They clear OK, though the spring that goes between the 2 levers can bow out and touch once you get some play in the cable. 13" ProRace 1.2s fit over them as well I believe.
They are short of leverage though, with a very wooden feel. I made a relay lever in the tunnel that multiplies the leverage and gives a strong handbrake with good feel.


They are short of leverage though, with a very wooden feel. I made a relay lever in the tunnel that multiplies the leverage and gives a strong handbrake with good feel.


-
jeffw
- Posts: 2605
- Joined: Wed Jul 01, 2009 12:31 pm
- Name: Jeff Wiltshire
Re: Sylva J15 Build
You have some great details on your car Adi
- adithorp
- Posts: 1200
- Joined: Thu Jul 02, 2009 8:26 am
- Name: adrian thorp
- Location: Hyde, Manchester
Re: Sylva J15 Build
Thanks Jeff but to be fair, quite a bit of it is function over form and wouldn't stand up as art. Certainly when put up against some of the CNC machined stuff here.
That bar does pivot on a phosfor bronze bush though... but only because I had some of a suitable size sat in a draw that we made as replacements for my old mans Granada door hinge bushes. I've never really been happy with the angle that the first section of cable pulls at but it was forced on me, as the lever wasn't originally there... until I realised the h/brake didn't work. It would mean moving either the handbrake lever or cable anchors to the opposite side of the tunnel to sort and there's not really enough room for either due to the prop' and diff' alignment. It's worked for 6 years though.
That bar does pivot on a phosfor bronze bush though... but only because I had some of a suitable size sat in a draw that we made as replacements for my old mans Granada door hinge bushes. I've never really been happy with the angle that the first section of cable pulls at but it was forced on me, as the lever wasn't originally there... until I realised the h/brake didn't work. It would mean moving either the handbrake lever or cable anchors to the opposite side of the tunnel to sort and there's not really enough room for either due to the prop' and diff' alignment. It's worked for 6 years though.
Return to “Jeremy Philips Cars”
Who is online
Users browsing this forum: No registered users and 1 guest